27 Sept 2010

Starting the Bocage


Now I've taken the plunge and gotten myself a load of FoW it seems only right to make some scenery so I've started some bases to put hedges on top of to from some bocage.

About 6 foot of the stuff!

I've also based and put together a 15mm Radar station that I got at Colours a few weeks ago. Lovely little model.


Some thoughts on scenery........


I read some time ago the thoughts of one scenery maker who was of the opionion that scenery should never just be a lump that sits blocking LOS. I cna't remember who it was but they instilled in me the ernest belief that the figures should be interacting with the terrain not just edging round it. I'm also of the opinion that if your theme your scenery it, quite obviously, adds an extra narrative element to the games. I tend to approach my scenery making with these things in mind now.

I've had an idea to build some sort of church for some time and when I ended up owing the Silverfox a favour (thanks for the figs Fox!) it struck me that I could combine the urge to unleash this idea along with meeting the promise I had made to Da Fox.

The post I made on the 03/09/10 shows the basic design but I hadn't giving much thought to the roles each piece would fill as a piece of scenery. By roll I mean what impact each one would have upon the game. I came to the conclusion it is important to have some areas that give light cover and difficult terrain tests but not block LOS at all. Others should offer limited LOS blocking for troops but not vehicles and then others should be able to block LOS for both troops and vehicles.

I think the end result actually met these requirements and I think it will lead me to include this requirements in plans for any future sets. Plans? Oh yes.....we have plans!


26 Sept 2010

GoG's Septemberama 2010

Clash of the Titans...or not!
Well this last weekend has seen a whole gammut of activity taking place at the GoG's resident gaming hall..Tea Urns garage!
Here we have Eddie artillery's Howling Griffons taking on the Silverbacks Blood Angels, what a slugging match this turned out to be! The Angels brought Dante and Astorath with them, while the Griffons brought most of their company artillery! The 10 strong Terminator squad going toe to toe with Dante, a Sanguinary Priest and 10 assault marines! The Blood Angels army is a product of the SiverBacks hard work over the last month, painting and building the army pretty much from scratch....all of the painting predominantly having been done with his new airbrush...obviously the finer detail has been done with the brush, but the majority has been air brushed! A very fine job indeed my friend, Astorath's wings are a real work of art, having a real look about them!! Fantastic.....He's also got a Drop pod and a couple of Baal Predators in the army that have been weathered and detailed with the airbrush and I intend to get these on the Blog in the next few days, they have to be seen to be believed!


The Terminator squad took quick refuge in one of the burned out ruins!


One of our most proficient scenery makers, Eddie Artillery has quietly been working on a project foe the Silverfox. This is a themed piece of a bombed out Cathedral, there are several pieces to this model, all the sections are modular allowing the terrain piece to be either a relatively small piece, or stretching to encompass pretty much the whole table top!

During the early part of the weekend Tea Urns Chaos Marine army was duking it out with Silverfox's Daemon army.


Here you can see the lay out of some of the terrain pieces.
One of our junior members CJ, has just finished a week in Lenton with his Father, the Silverfox and during this week they both undertook the painting and modelling masterclass, CJ has now got a fine Imperial Guard army in the making...My Ork army took on the might of this army in my first game, and a right royal ding dong it turned out to be! The Manticore is very nasty!!

Overall three games a piece and 2,000 pts a side saw a very busy day for all, the overall winner being Tea Urn with his Wordbearers army. Hopefully this will get finished in the near future as it has a lot of beautifully converted models within it's ranks. The arrival of little Urness has mean't that Fatherly duties have taken a president obviously, but hopefully he will find the time to pick up a brush and get a unit at a time finished!
Watch this space!!!

24 Sept 2010

Landing in a Battlefield near you

With one day to go until our September Saturday kicks in I've completed my Slaanesh DP (well ok completed apart from the basing... sheesh so picky:-)).

Anyway I wanted to try out mixing paints on this guy and because GW go for the Heroic Size models with bulging muscles I've gone for large swathes of deepened recesses to try and exaggerate the build even further.

I think under normal lighting conditions that he looks fine, up close I'm not too sure. I'll let you chaps out there in the Blogoverse be the judge of that.

Getting a decent picture also proved painful...

So front on:
The skin is Hormagaunt Purple, then a Leviathan Purple Wash, then a 2:1 mix of Hormagaunt Purple & Space Wolf Grey and a final 1:1 mix of the previous combo. I didn't quite mix enough so some areas are a little sparse but hopefully those are hidden away!

The Horns have Warlock Purple mixed in and I even ended up using good old Tentacle Pink at certain points.

The wings...
I wanted the membranes to be toned down so that the pinky bone stands out more. The membranes are Liche Purple, Leviathan Purple Wash, Azurman Blue Wash, Regal Blue, Mordian Blue, Ultramarines Blue, Enchanted Blue and a final Azurman Blue wash. Phew.

The Sword...
I played around with this and painted it Regal Blue then Ultramarines Blue around the lightning design. Enchanted Blue and then Ice Blue were painted into the Lightning. This was a little bright and distracted from the model so I then washed it again with good old Azurman Blue.

Once again I've enjoyed experimenting and I can't wait to see if all the time spent painting him is worth it when he takes to the field of battle on Saturday.

Hmmm the above pictures are not really doing it for me so here's one taken under normal lighting conditions and from a more leisurely distance...
Is it Saturday yet????

9 Sept 2010

You can teach an old fox new tricks...

Good day to one and all. For those that know me I've been doing this hobby for more years than I care to mention and have improved the collecting, building and playing sides over those many years.

You'll note that painting is missing from that list. Although it has probably improved I don't think I've ever really knuckled down to learning painting and this was something I wanted to address. You see I have so many armies now that speed painting a new one doesn't appeal so much: what I really want to do is take my time and paint up a new and improved army. The next one to be done are the Space Wolves.

During the Summer my son and I spent a week at Warhammer World on what they call a Hobby Camp. You basically spend the whole week from 9 to 5 every day doing your hobby: so you'll build, paint and play. You have access to the staff who will show you how to do whatever it is you want to do. So I decided I really wanted to take my 2D painting and turn it 3D.

My Wolf Scouts won me a Best Painted Unit award at the end of the week as they liked the improvements I'd shown - that was special! I will post them but they're not yet finished and so you'll have to wait.

In the meantime I then decided I needed to practice what I learnt and so the cowboys you see in the pictures below have been painted in the last 2 weeks.

So what's new? Layering. Note the shading in the trousers and shirts - done with layering primarily rather than washes.
Highlighting - although I knew the concept I'd never studied the colour hierarchy. Here you'll note highlights on the trench coats, jackets and hats primarily.
Strong Colours - I've used the red shirts on all the models to tie them together as a posse rather than a bunch of individuals. Up to now red has always been a pain to paint for me but with layering and working up to Blood Red it's so much easier!
This shot gives a better view of the hat highlighting. The bases are a simple sand washed with Devlan Mud and then drybrushed lightly with Graveyard Earth.
One of the biggest things I learnt was watering down the paints. I know this sounds so simple but I've never really bothered before as I wanted the one-coat solution. I was taught how to water the paint in the lid so that you don't need a tile and when you've finished the watered paint falls into the pot thus keeping it fresh and also keeping the wastage down. So these models are all done using thinned paints as well.

Some of these pictures blurred a bit - must get used to the camera.

All figures are from Black Scorpion.
5 Indians including the Outlaw Chief.
5 Mexicans
5 Outlaws

And there you have it. I also learnt how to mix colours so expect that on my next paint job - the Daemon Prince pictured previously. Oh and I will be experimenting with faces more soon as well.

I was asked the other day what the one best tip was that I learnt during my week at GW HQ. Having had a chance to think about it I have to say that the best thing for me is the fact I've been given the confidence to experiment and push myself with painting. I'm energised again!!

6 Sept 2010

Stoking the Flames of War


I have decided to chip away at the prep work for my new FoW collection at the same time as working on the church terrain project. This way I can nibble away at the tedious work of filing, trimming and basing of all the figs in the spare half hours I have here and there.


Hopefully it should all be done around the same time as the church is finished and I can throw myself into getting it all painted. Done so far are several bases of Artillery Observers and Staff and these two bad-ass 88s!

The latest scenery project.

The Silverfox recently gave me some Tau goodies to help with my newly expanding force. In thanks I commited to building him some scenery. Thankfully I managed to convince him to let me build something that I've had kicking around in my head for a while.

The diagram above is my design sketch for the project with a few of the details noted that I intend to include in the build. I actually started construction a week ago but I'm going to hold off posting piccies until I have finished and the Fox has seen it in person.

The central idea behind the design is that the basic church, which measures 3 foot by 2 foot, can have all of its parts spaced out even further so that the entire church could be spaced out to be the entire table. It also leaves the possibility open for extra sections to be added for special occasions like Apocalypse games.

So far I have made the Aquila floor section, the central columned section and the wall section to the left of the columns. I'm using a mix of blue foam and Hirst Arts blocks which has, so far, proven to be a good combination as the Hirst Arts blocks provide a nice level of details and the blue foam keeps the weight down.

I must say that I am really enjoying building this one!

3 Sept 2010

Airbrush-tastic

Now you all know I have banging on about my new airbrush and I have spent a lot of time pounding the web looking for 'How to' videos.  So I have used what I have learnt and produced 2 pieces of work to date that I thought to share with you.  Now, as ever the pics won't do these justice, so please bear that in mind.

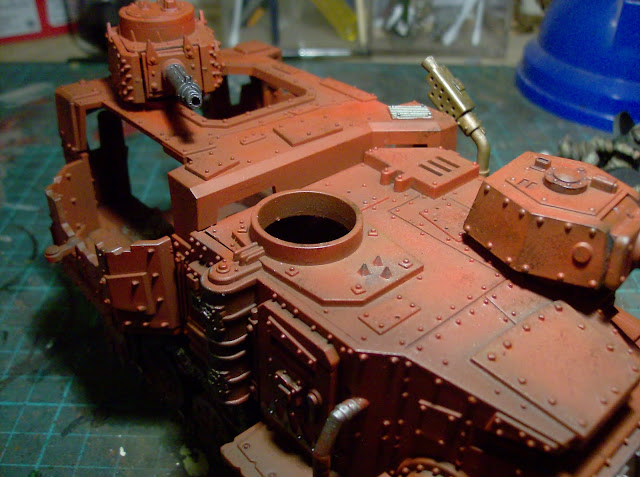
The first is an Ork Battlewagon.  I promise you this took less than 25 minutes to paint 3 different coats of red on.  The effect is lovely to behold.  I then used a piece of blister sponge and some 'Smoke' effect from Vallejo, to produce a bit of weathering on the plates.  I have not done any true detailing on this yet, except pick out some of the metal bits.  The three reds were sprayed in reducing areas on each plate, thus giving the illusion of shading.


Next up, and I think you might be a little surprised at this.  But this model is entirely sprayed - no paint brush has been applied to the model yet.....

The effects on this was based on three different blues.  These were sprayed in 6 reducing coats to give highlights, the last of which was mixed with white!  Again this took no more than 30 minutes in total achieve.  Next step is to pick out the details, and maybe add a light wash to certain areas.  So what do you think?

Veterans R Us

So here are my IG veterans.  2 squads with 3 meltas and 3 plasma respectively.


Now, there are 2 points to note when you look at these...

1.     The heads are from Westwind; their SGS WW2 Germans with gasmasks. 

2.    I used my new found airbrush skills to spray the sandy colour uniform.  I then used the airbrush to paint the shoulder pads, the chest and back plates and weapons.  There was minimal overspray which was easily sorted with the sandy colour on a brush.  20 guardsmen with detailing in less than 3 hours..... awesome!